Charmed, I'm sure.
Posted by Christy Miller on Thursday 5 December 2013. Filed under: mini charm packs, Moda Fabrics, Moda marmalade by bonnie and camille, Moda sunnyside by Kate Spain, pillow forms, pom pom trim, what to do with a mini charm packNo Comments »
I've always been intrigued by the mini charm packs I've seen in the quilting store.

But I wondered what on earth you would do with them.
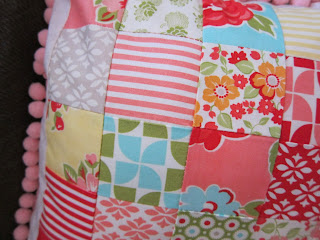
When two of my best friends' birthdays were on the horizon, inspiration struck and I decided to make each of them a mini charm pack pillow. Both pillow covers were made to fit a 14" form. Interestingly, the charm packs I had bought seemed to "fit" with their personalities, making the project even more fun.
For such a little project, it allowed me to call on a number of different quilting skills - something I haven't had the time (or energy!) to do in a while.
Here's how it went:
First, I admired the fabric and arranged a 5 x 5 grid in a pleasing design and then sewed each row together using quarter-inch seams.
Then, using my quilting smarts, I pressed the seams on each strip, alternating the direction of the press in each row. You can kinda see this below. See how the seam on the top left square is pressed away from itself, but in the row below, the same square has the seam pressed towards itself? This allows for the nesting of the seams, which helps to make perfect points.
To sew the strips together, I put right sides together and lined up the seams so that they fit snugly into one another. This should work if you've alternated the direction of the press on each row. Double check before pinning and sewing the strips together.
Once all of your strips are together, you can press the entire panel, again alternating the direction you press each seam so that it lays flat.
And voila! Your quilted panel is complete!
Next, I added borders to the quilted panel, ensuring that the front ended up measuring 14.5 x 14.5 to allow for a quarter-inch seam on all sides for a finished size of 14 x 14 inches. The border fabric I used was a vintage find from Village Green.
Sewing the piping in was quite the mental challenge for a sleep-deprived mom. Which meant that of course, I pinned and sewed it in the wrong way first.
 |
| Guess who is going to be using her seam ripper? |
| I consider myself an intelligent person, but sewing without a pattern challenges my brain in an entirely different way. Which means that I often have to do things twice. |
 |
| This was the right way to pin the piping in before placing the back of the pillow right side down on the top. |

For the pillow using the marmalade mini charm pack, I opted to add pom-pom trim after it was sewn with a regular seam. A little more time-consuming, but it looks (and feels) so great!
 |
| I love pom pom trim! |
I hope that both pillows find a cozy corner in my besties homes! Is it fair to get this much joy out of making the gift?


